

This project comes to you courtesy of my sister. We were shopping the local salvage yard and we spied their stack of shutters. Since I still have a few shutters on my to do pile, I was not interested. But then she notices that these shutters are actually hinged together…a ready made room divider. According to her, I wouldn’t have to do anything with them and before I knew it, they were on my cart and in my car.
I’ve been waiting for a nice day to take these outside and give them a good scrubbing and that day had finally arrived. They were in good shape but really really dirty.

Even after scrubbing there was still some lingering dirt so out came the paper towels and all purpose cleaner. Did I mention that these shutters were dirty? Scrape off any loose paint.

I couldn’t just stand the shutters up and call them a room divider, that would be a rather boring post so instead I decided to paint a flag.
What inspired me to make a flag was that these shutters were already blue and thru all my 22 shutter projects ( and counting) I have decided that I really do not like painting shutters. So any time I can use the existing color, I’m all over that! So a blue background for stars..perfect!
Start out with the stripes and paint every two sets of slats. I’m using a blue, lighter than the shutter itself but close to the same tone. If you’d like less contrast, find a color closer to your shutter color. More contrast?…consider using white. It’s up to you.
Paint 3 quadrants of your shutter leaving the upper left part of one of the shutters for stars.

For the star part of your stars and stripes make your own stencil. Print out a star about equal to two slat widths on card stock. To make sure it lasts through all the stenciling and is easier to clean off, cover the star with a couple strips of clear packing tape. Cut out.

Start stenciling. Use a stencil brush with the same blue you just used for the stripes. You may want to have a wet paper towel ready for any paint you get on the other slats. I’m speaking from experience here.

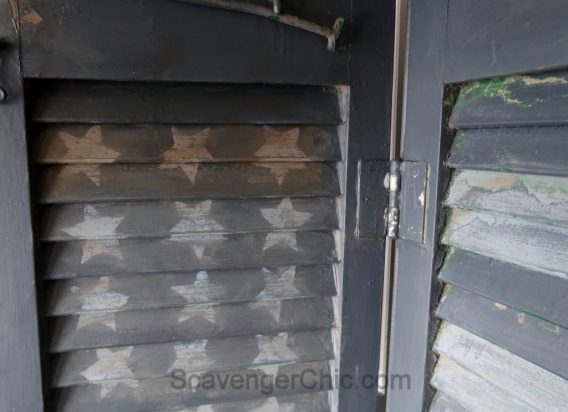
When the top half of the stars have dried, go back and stencil the bottom halves.

Freshly painted stars and stripes. This actually took longer to clean off the shutters than it did to paint.

My stars and stripes looked a little too freshly painted so out came the sander.

I’m just sanding the light blue, not the darker blue background.

This is a tip from Flea Market Flip, one of my favorite shows…if you have flaky paint and you don’t want to get rid of it, seal it with a mixture of wood glue and water. The mixture is about 2/3 wood glue, 1/3 water, but that’s just a rough estimate.
I used the same technique on my termite infested trunk which had some beautiful flaking. These shutters only had flaking paint on one side of one shutter, probably the side that got the most weathering.
I wanted my flag to be subtle, not scream red white and blue and it wasn’t quite subtle enough just yet. Out came the chalk paint wax.
This is the liquid wax and not the paste. The clear wax was too clear and the vintage/ antique wax was way too dark. My solution… I have a wax mixture sitting around in an old jar of mostly clear wax with just a little vintage wax mixed in. It’s the perfect muddiness for this project.


I’m still on the hunt for more shutter ideas, I’ll let you know when inspiration strikes.
Shared at Metamorphosis Monday,
Talk of the Town, Wow us Wednesdays,
Discover more from Scavenger Chic
Subscribe to get the latest posts sent to your email.


gorgeoyus!!! great inspiration!!! thank you!!!
sincerely…
Angela from NJ