
If you’ve been following my blog for the last month, project by project I’ve been revealing my workshop makeover. You can find it here, or here or here or here or here and even here. But the last project and the one I’ve feared the most is what to do with this side of my workshop.
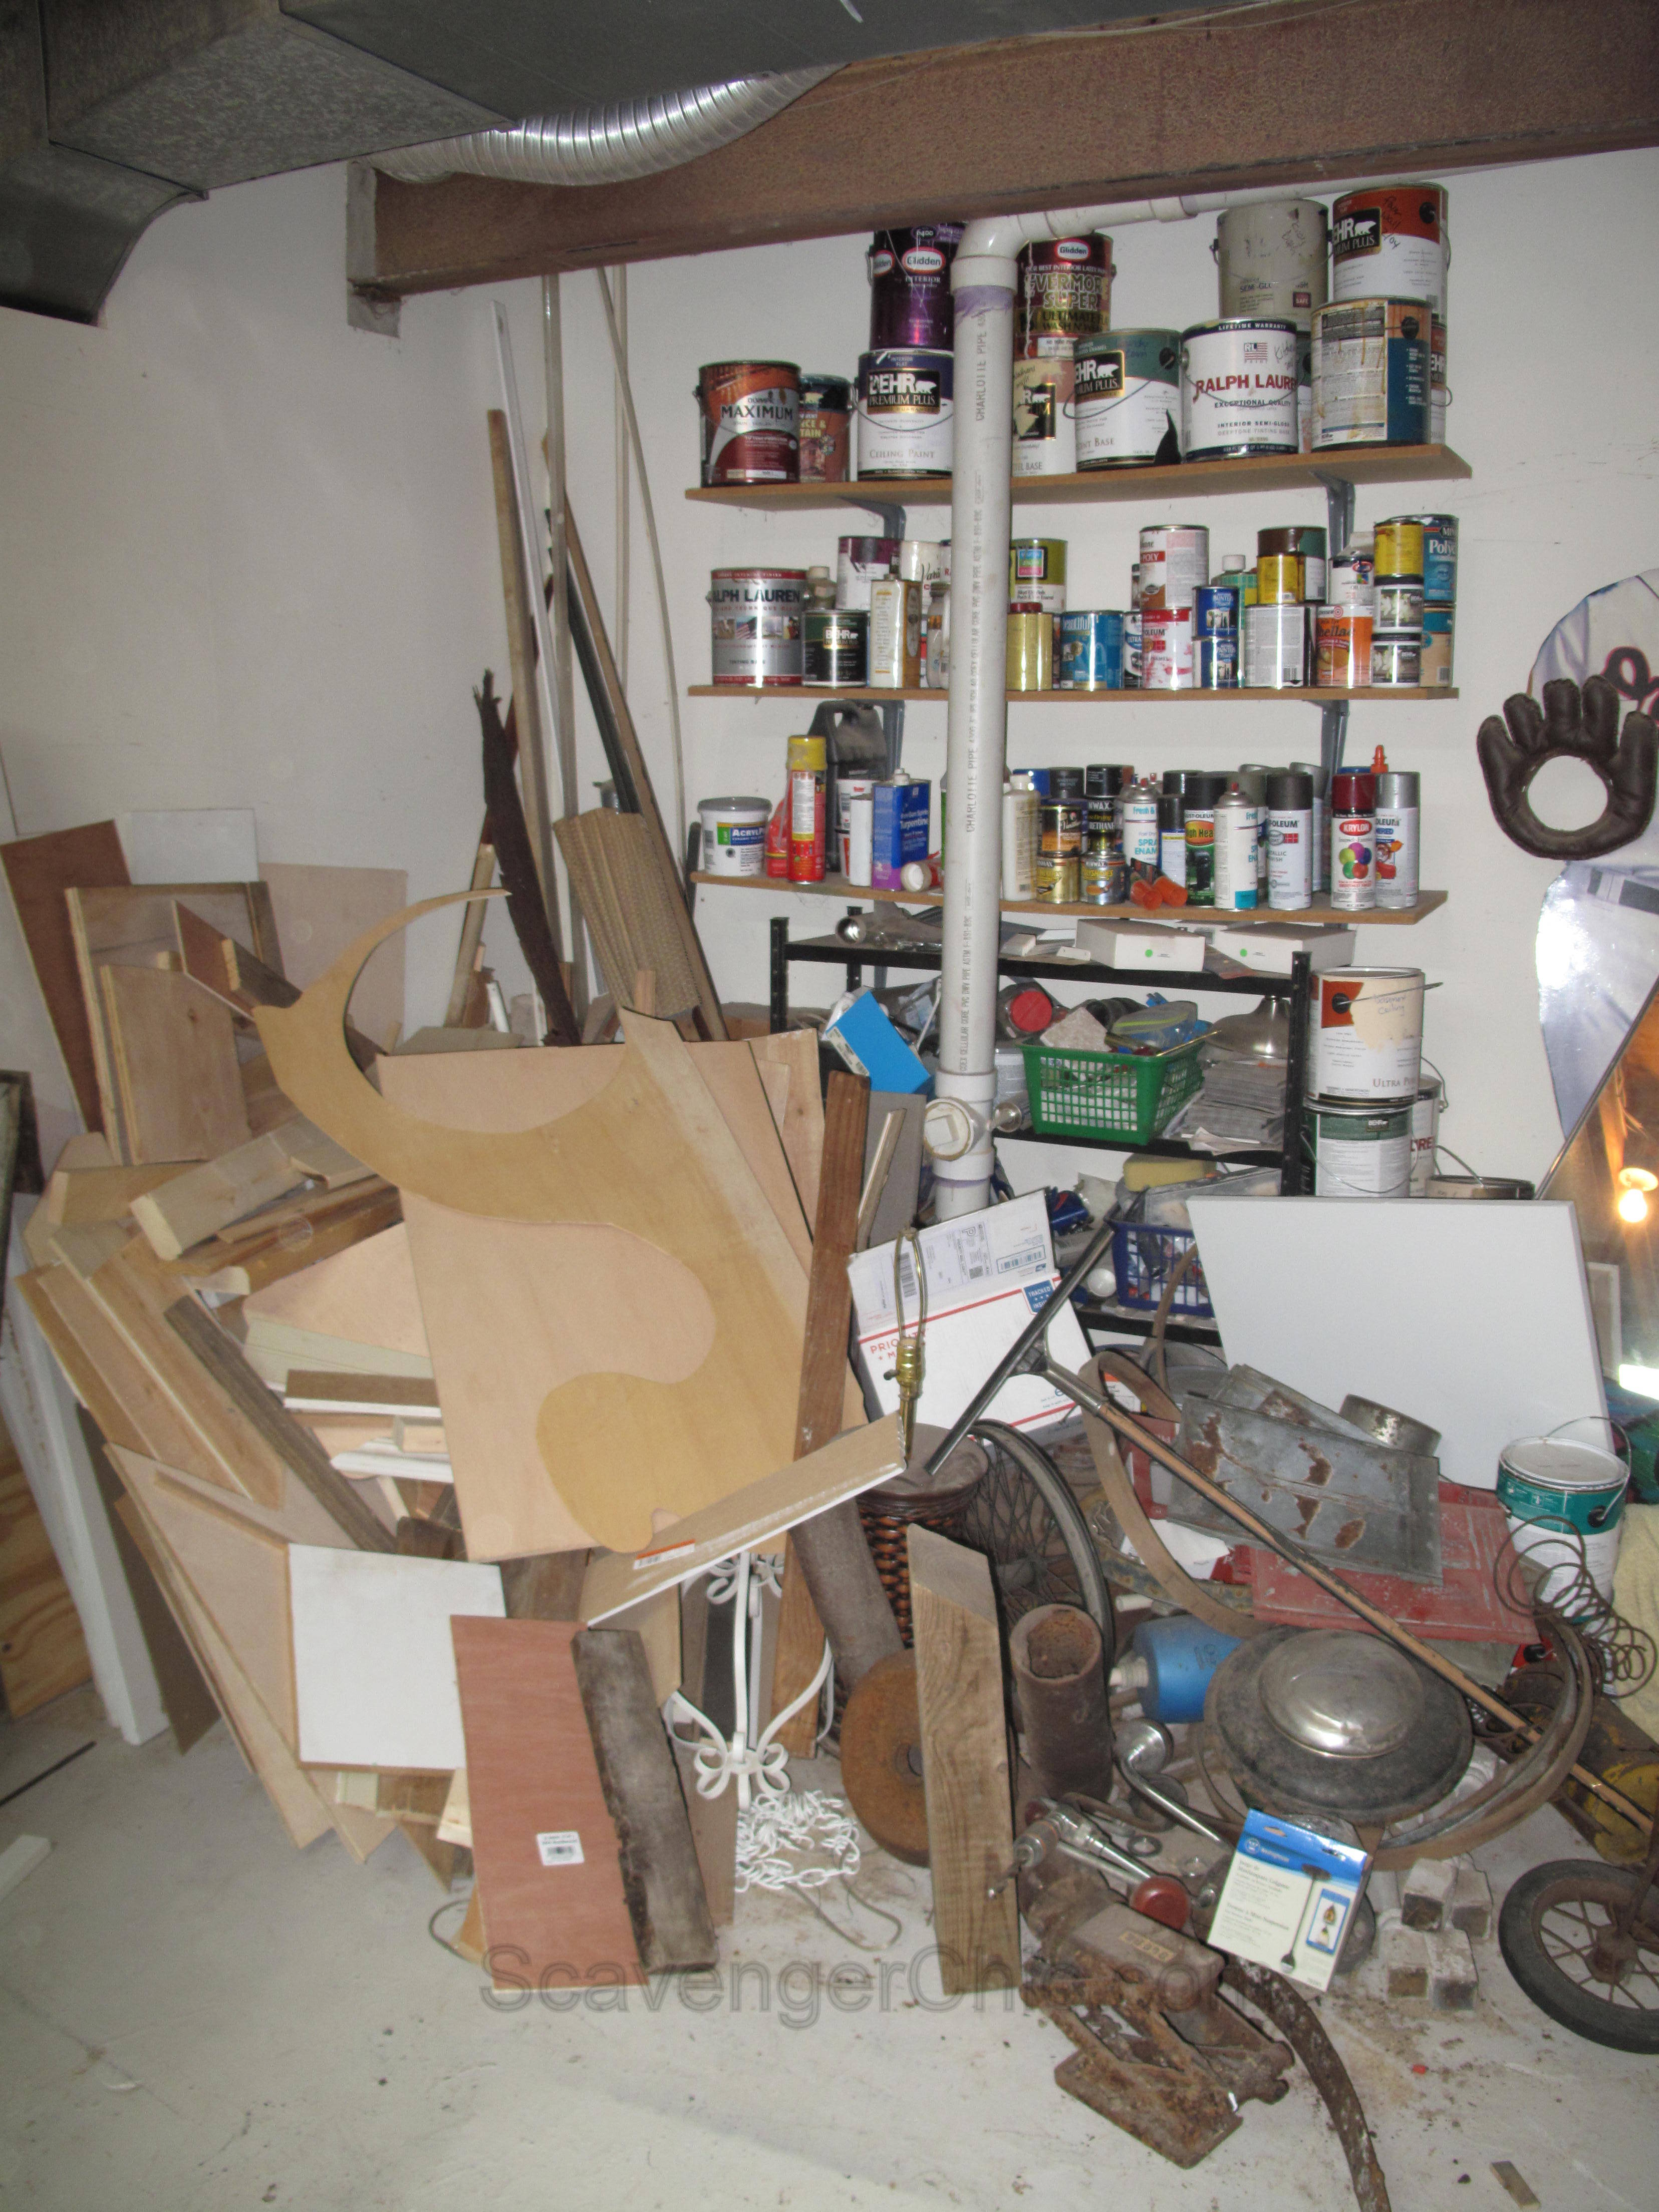
It was pretty bad, I couldn’t even get to the shelves due to 4 feet of stuff in front of them. So, while the other half of the workshop was looking fantastic, I couldn’t call it quits until something was done with this mess.
What I really needed was a cupboard, big enough to hold all the cans of paint, stain, spray paint, tiling supplies…and any other junk that happened to be on those shelves (and on the floor…things that didn’t fit on the shelves) Hidden storage was the key to my happiness.
What if I could actually build a storage cabinet with shelves that looked like it could have been pulled out of an old barn or shed. And what if I could build that cabinet and then cover it in old wood planks to give it an old rustic look.

So, two weeks ago my wonderful husband asked me if I would be interested in going to a couple of salvage yards. Are you kidding, it wasn’t my birthday, maybe it was an early Valentine’s present…OK let’s go.
And that is how we ended up here, at a Salvage Yard in Baltimore, The Loading Dock. Apparently these places are not warm in the winter, I’m wearing 2 pairs of pants and 3 sweaters, but I’m ready to scavenge. If you look closely you may see a bit of drool at the side of my mouth…right where I’m standing is where they keep the barn wood. OOOOOooooo, I am so coming back. But right now I have a mission, to find planks for my storage cabinet.
When we started out, the only plans I had were, I wanted a cabinet about 7 feet tall, about 4 feet wide and deep enough to hold two cans of paint. How is that for measurements?

What we came home with, were these 18 cedar planks, about 8 ft long and 7 1/2″ wide, painted on one side. I ended up using 15 of the planks and I’m so excited to have extra for future projects…

http://ana-white.com/2011/12/plans/patrick039s-jelly-cupbard
I still had no idea how I was going to build this cabinet that I had already purchased a stack of wood for. That’s where the internet comes in really handy. A quick browse and I came up with plans for this Jelly Cupboard over at Ana White. Other than it was too short (only 4ft), too narrow (12 1/4″), not wide enough (only 35″) , I didn’t want the screening in the door, I was using planks instead of solid piece of wood and I wanted mine to sit on ball feet….other than that it was perfect. Do check out those instructions for a lot of great tips on assembly and finishing.
Given all that…it was a great starting point.

First things first, I had to get a measurement for my finished cabinet. This is what I was dealing with…the white pipe on the left with a little crook in the pipe going into my space, the rust colored pipe on the right and a beam on top just out of the picture. Yes, I wanted my cabinet to fit right into there.
To get the height of the side planks. Measure the entire space at it’s lowest point (81 inches).
Subtract 4 inches for feet.
Subtract 2 inches for top and bottom boards and an additional inch for maneuvering (and any math errors)
81 inches – 7 inches=74 inches….Cut 6 cedar planks, 3 for each side, 74 inches in length.
At the hardware store purchase a 4′ x 8′ 3/4″ plywood. It was easier for me to have the store cut my board into 5, 19″ widths rather than trying to fit a 4′ x 8′ piece of plywood into a sedan.

For the next step, you’ll also need 2, 1″x 2″ by 8 ft pine strips cut into 8, 19 inch lengths. Ends were trimmed for a nice rounded edge and sanded.

The planks were laid out on the floor and attached with glue inside the tongue and groove joint.
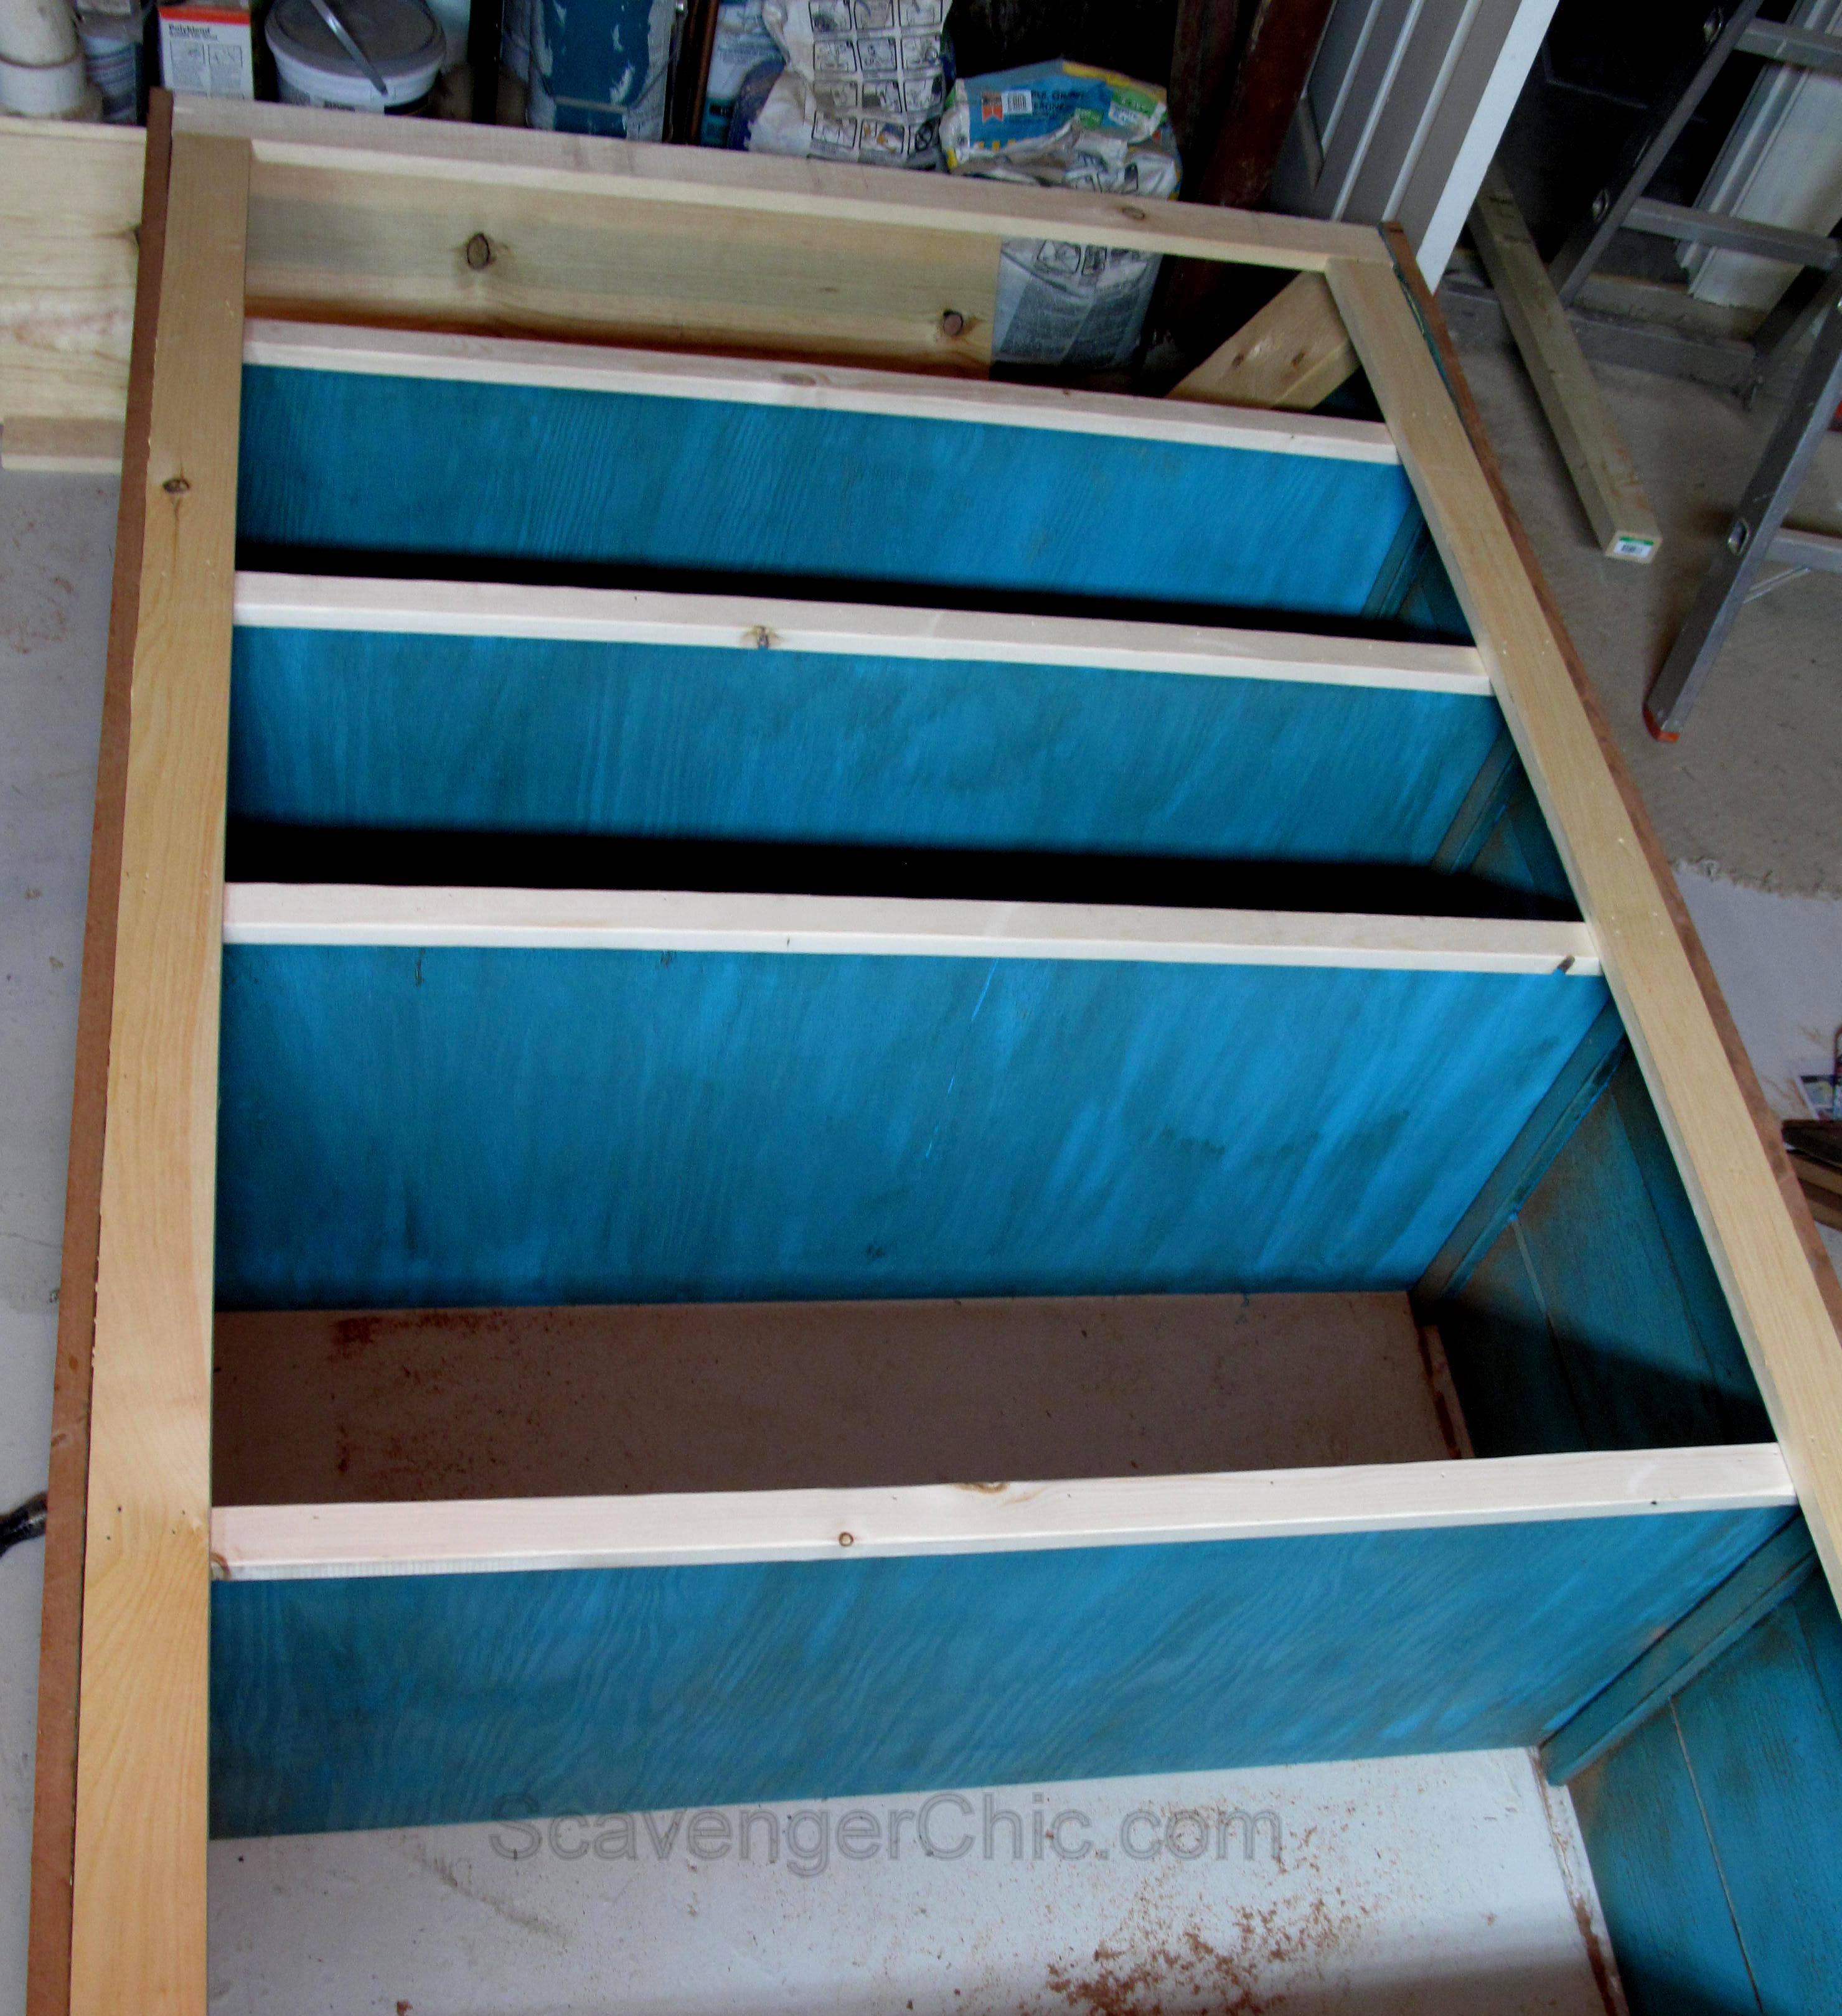
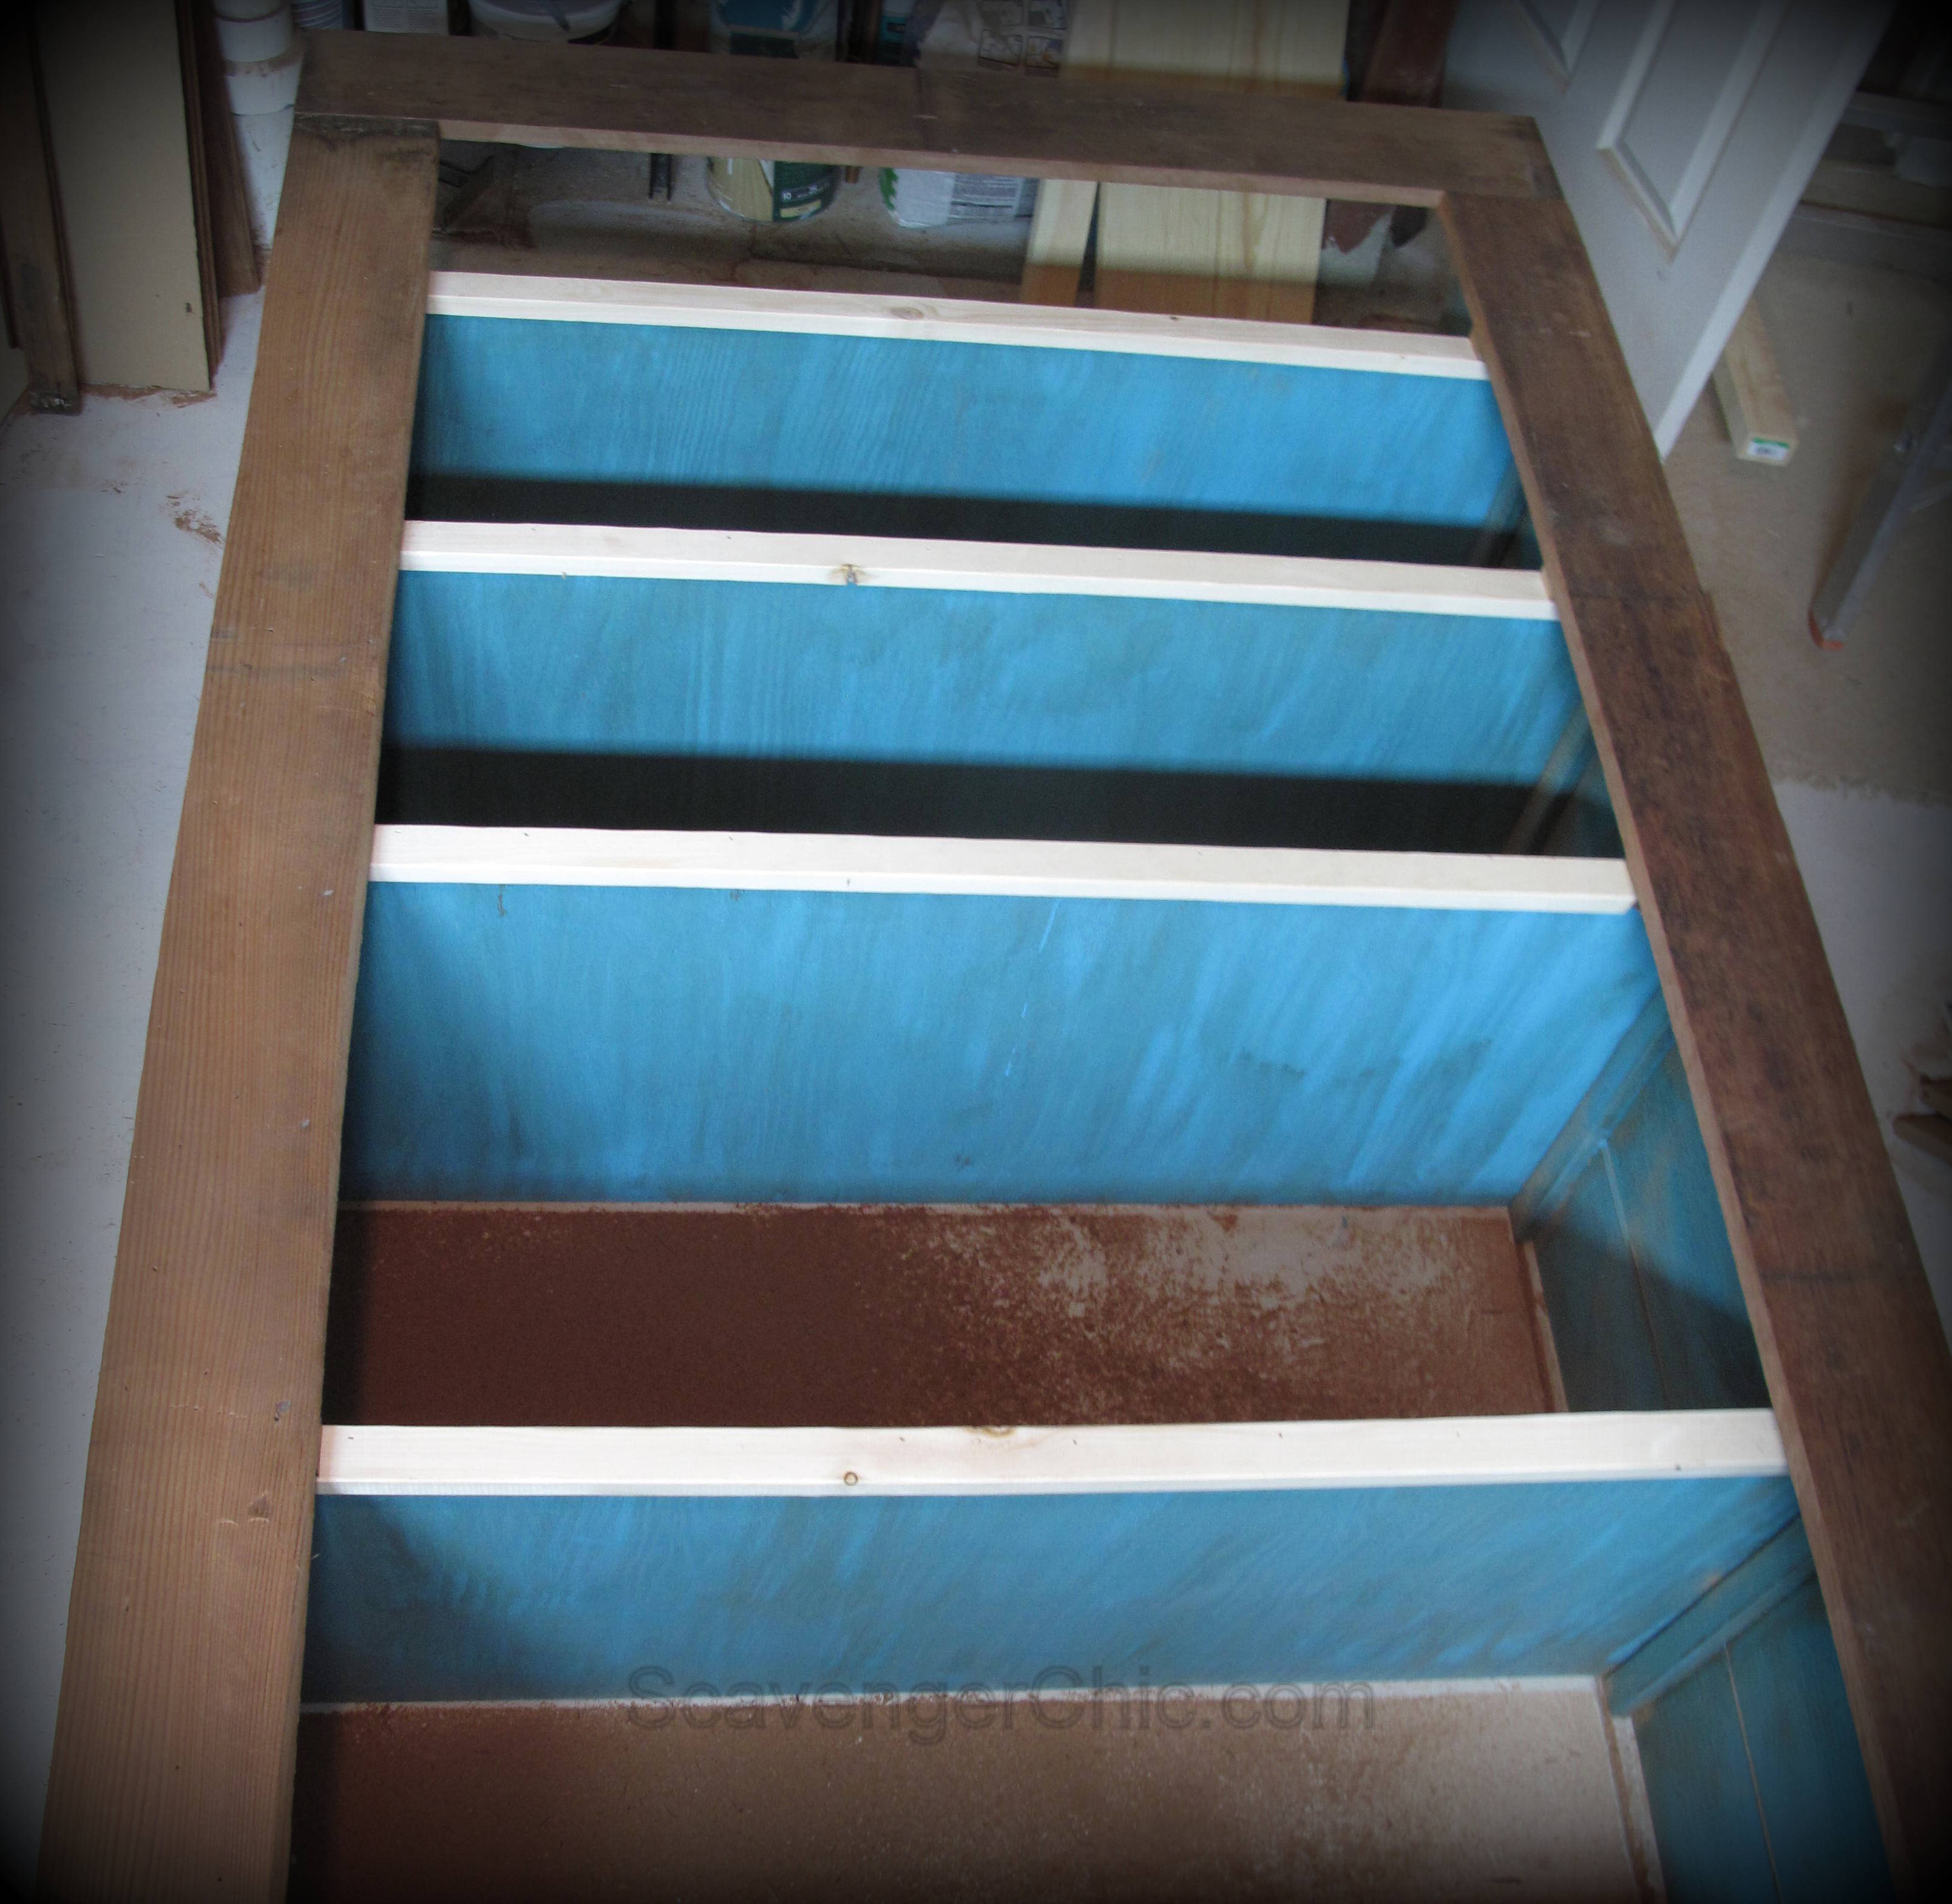
The shelf supports were lined up and they were glued and nailed into place. There is more space allowed on the bottom two shelves to hold 2 cans of paint sitting on top of one another. I must say I went a little crazy with the nail gun, those supports aren’t going anywhere. The shelf supports held the planks together while the glue was drying and gave the sides more stability.

The shelf boards were cut down to 44″x 19″ to fit inside my nook. Since the plywood was rather rough, gave it a good sanding with a palm sander.

While I know this is just workshop storage, I did want the inside of the cabinet painted in case I ever wanted to use it anywhere else. It was easiest to paint all the shelves and the walls while they were still sitting flat rather than trying to get into the nooks and crannies later.

Sanded down the pieces to get rid of any rough spots and to give it a little aged look before attacking all the pieces with a dark walnut stain wiped on with a rag.

The shelves were attached with glue and nailed onto the shelf supports. The bottom shelf, where there were no shelf supports, was glued and nailed from the outside of the planks.

Edge all 5 shelves with additional 1″x 2″ pine stripping…again nailed and glued into place. If you want you can paint it before installing, but since it was on the edge I waited until later. The edging gives the shelves additional support, helps keep the shelves from bowing and also hides the rough edge of the plywood.

Because my doors were going to be 2 thicknesses deep, I needed an extra border around the sides and top (not bottom) of the cabinet to give the extra depth. Don’t worry it will all make sense soon. This extra border is a 1″x 3″ nailed and glued to the shelf edging.
**Nail the top piece into place first so that it can be nailed to the side planks. It will get reinforced once the top of the cabinet is added.
Do you see where the side planks extend past the border that was just installed? That has to be cut down level with the border. I put the cabinet on it’s side and the edge was cut with a circular saw.
The sides are now even. If I had known what I was going to do with the doors ahead of time I may have cut my planks before assembling, but this way they are cut to the exact right size.
An additional border of cedar trim was now glued and nailed to the pine border that was just installed. This cedar border was 5 inches in width, cut down from the cedar planks.

Pieces of pine were now cut to cover the bottom going behind the shelf edge and just to the edges of the side cedar planking.
The top was given the same treatment but the top overhung the sides and front by an inch. That edge was sanded.
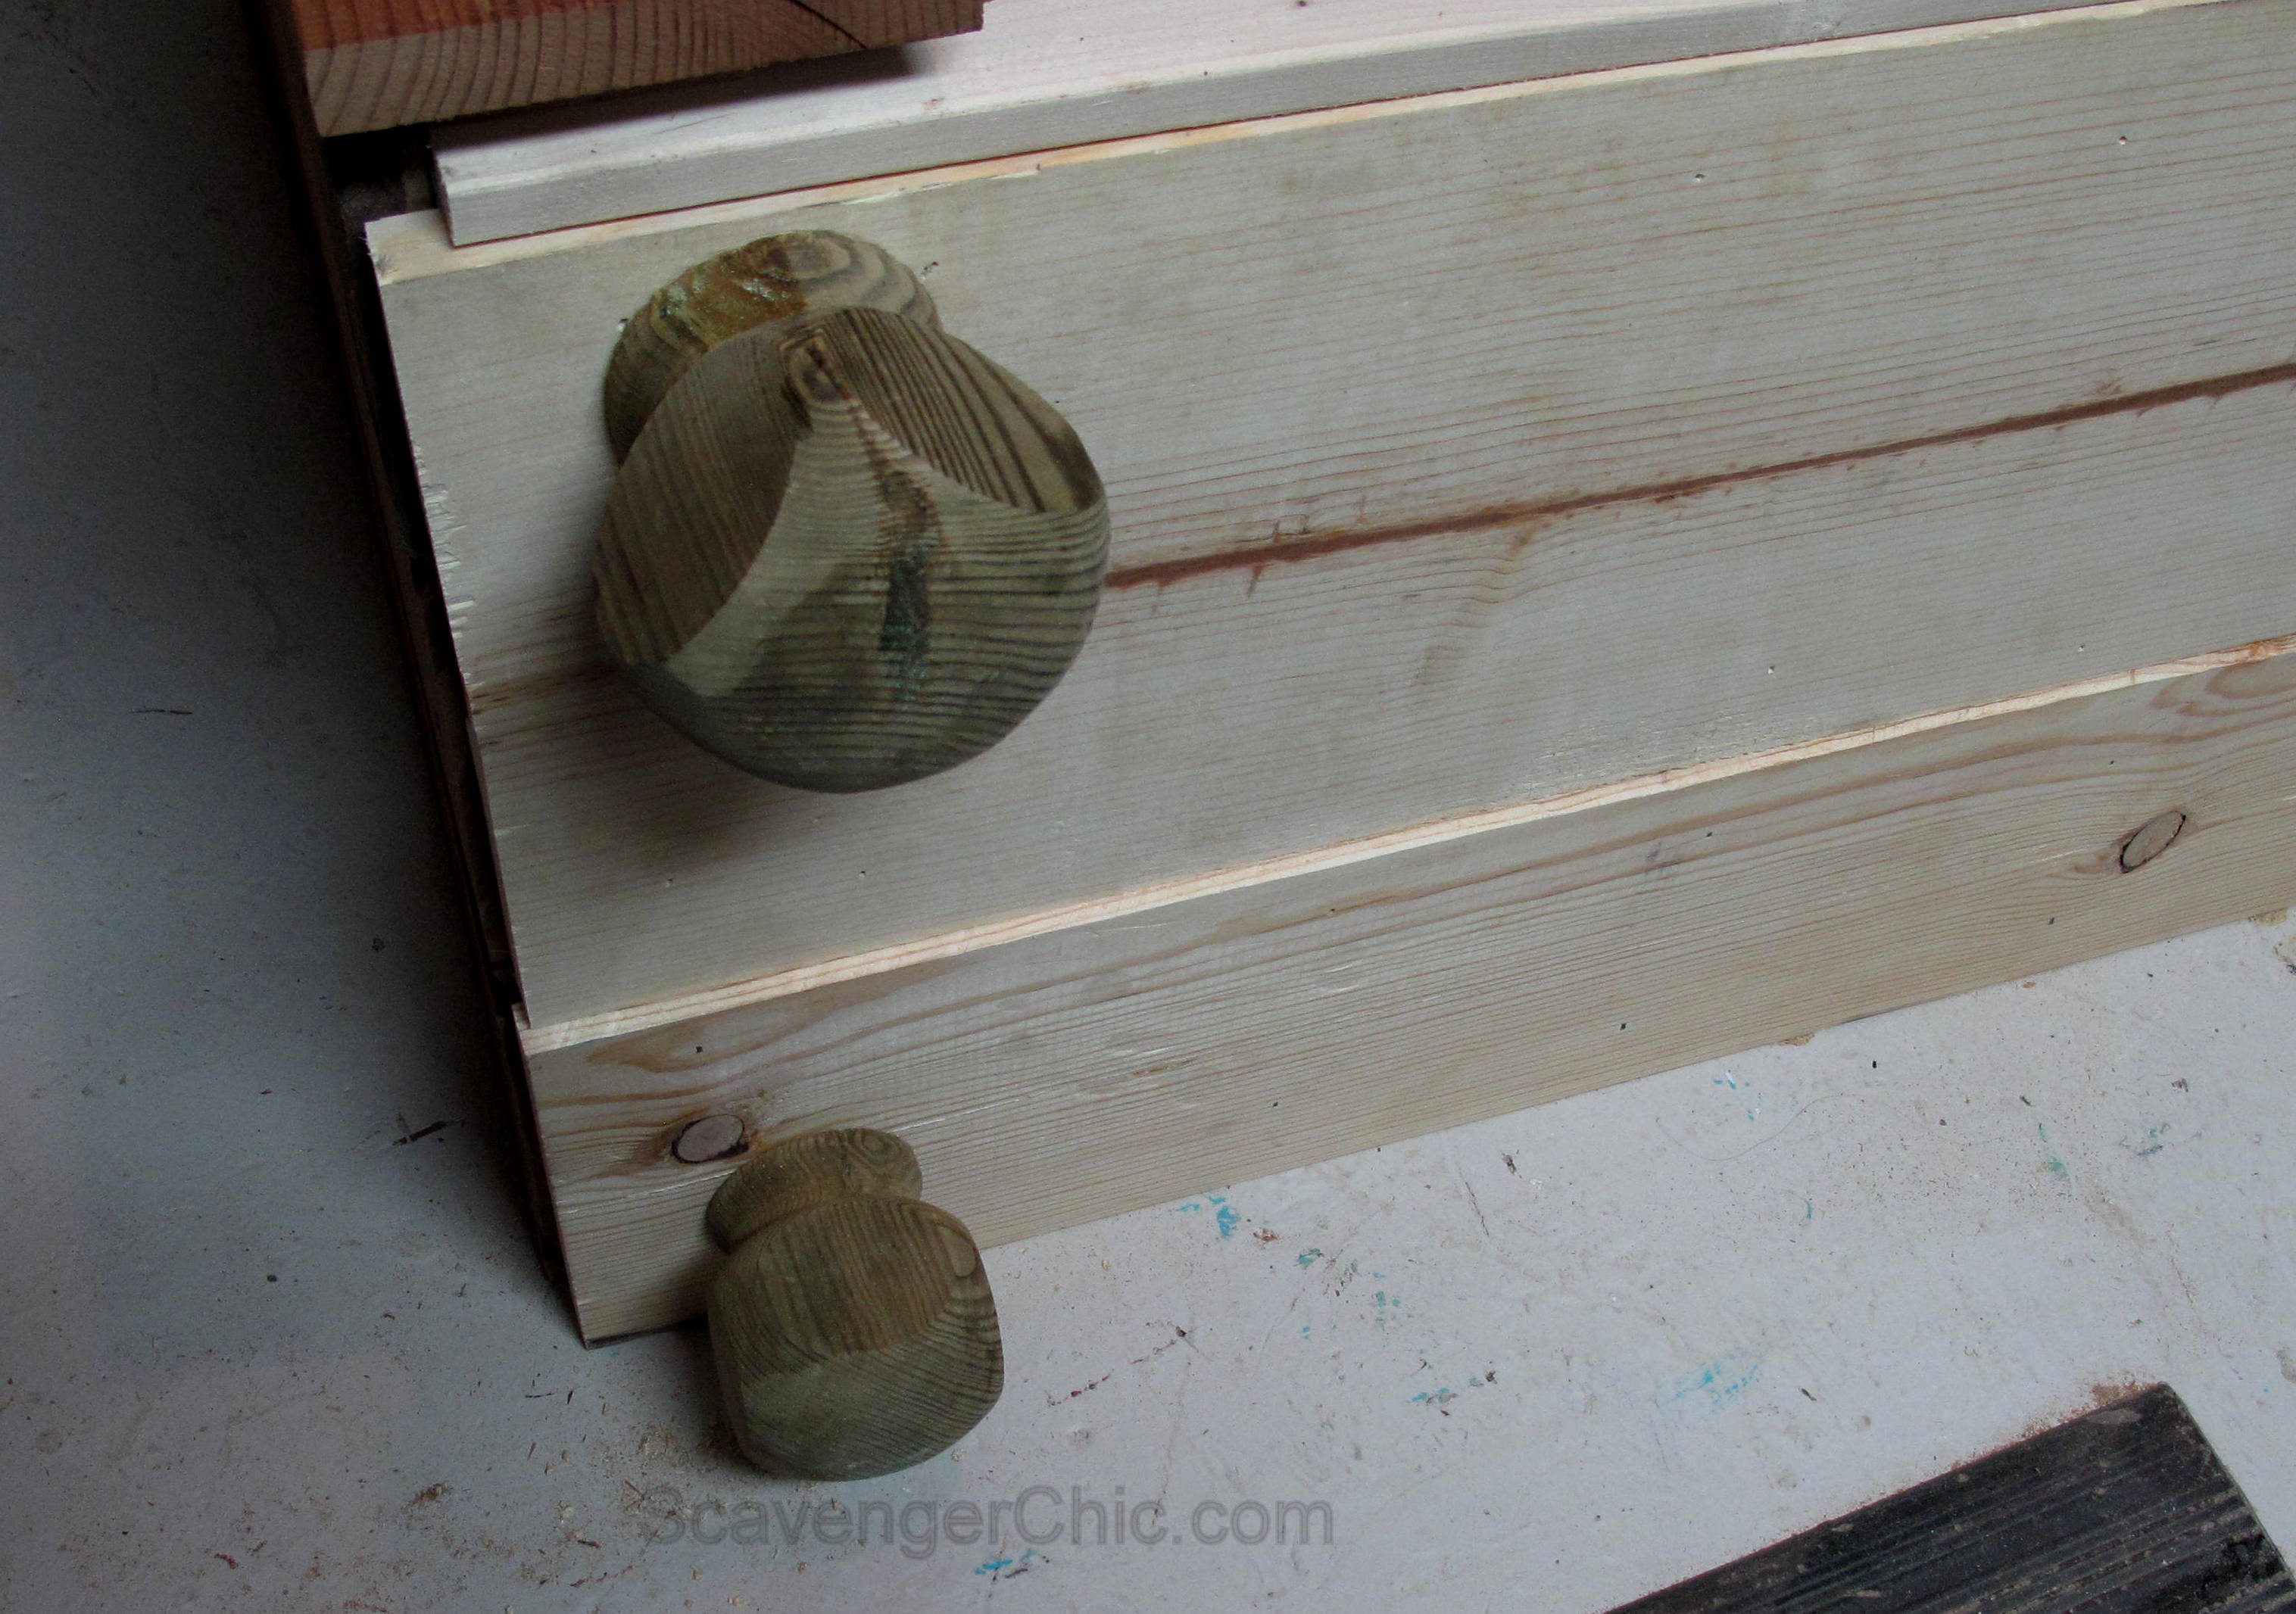
Screwed on feet. These are actually treated post caps from Lowes, at $3.48 they were cheaper than the $7.00 bun feet I liked.

With the cabinet laying down, started to lay out my doors. Chose to have the wood go horizontal so that I could use up a lot of the bits and pieces I had cut from the sides and trim. Leave 1/8″ on the sides to allow for the doors to open and close easier. Just like the sides, the planks are glued together in the tongue and groove edging.

A border was once again cut from the cedar planks. Each cedar plank was cut in half lengthwise and the tongue and groove was trimmed off the edge. Trust me when I say, I wish I had a table top saw for this step. These too, were nailed and glued into place.

A small trim piece of cedar trim was attached to the lower edges to hide the bottom board.

A piece of beadboard paneling was cut to fit the back. Painted and stained, it was attached to the back of the cabinet.
Finished off by staining the feet, painting and staining the shelf edges and adding hinges and a gate latch. The top piece was stained to match the cabinet.
When I first started this project I had every intention of painting the entire cabinet, but once I was finished I couldn’t bear the thought of covering up the cedar.

The shelves were unloaded. Was there any way all that stuff would fit into my new cabinet. The short answer was no. Luckily, after getting rid of all the paint that was dried up, colors that were no longer used and the spray paint nozzles that didn’t work, it did actually fit.

Bottom shelves fit 2 layers of paint cans.


Wood was reorganized and some of my larger rusty crusty pieces made their way over to my new rolling storage bin.


This is by far the largest piece of furniture I’ve ever made or even attempted but if you take it step by step you’ll find that it is totally doable. I hope I’ve inspired you to get organized and perhaps make your own rustic cupboard.
Shared at Metamorphosis Monday, Show and Share, Awesome things Tuesday,
Before and After Wednesday, Wow us Wednesdays, Vintage Inspiration Party. Treasure Hunt Thursday,
Create it Thursday, Creativity Unleashed, Catch as Catch Can, Morning Cup of Joe, Silver Pennies Sunday
Best of the Nest, Furniture Friday , Link Party Palooza , Funky Junk Party Junk Show me Saturday
Before and After Party, That DIY Party, DIY Sunday Showcase, Amaze me Monday
Hit me with your best shot, Something to Talk About , Nifty Thrifty Sunday,
Awesome things Tuesday , Flaunt it Friday , Friday Furniture Fix and Handmade Hangout Party
And I was featuared at


Discover more from Scavenger Chic
Subscribe to get the latest posts sent to your email.


Nice job…I mean, really nice. I feel a project coming on…:)
Wow, dream cabinet. Looks old, what a great place to store your paint supplies. Love the inside color.
Whoooooa, that’s very cool. i want one, or two
Am I tempting you to go to the salvage yard with me?
Awesome! I love that you found this from a salvage yard. So cool. Pinned it!
I love the surprise pop of color that the inside provides – good move leaving the cedar bare, it looks incredible! This is so good that you are going to start building any furniture you want instead of buying it 🙂
You never cease to amaze me with what you can do. It’s too bad I don’t have room for one or I’d hint. Great job!
Awesome build–just shared on Facebook! Thanks for linking up to Vintage Inspiration Party!
Looks great! I love the reclaimed wood and hit of color inside 🙂 Popped over from Miss Mustard Seed’s linkup!
Oh my gosh, I am so very glad that you linked up to the Best of the Nest party because I LOVED reading about you building this beautiful cupboard! I have always wanted to go to a salvage yard, that would be drool-worthy for me too. I’m amazed and inspired by the end result of your work – the cabinet came out beautifully and is so functional!! The barn wood is so gorgeous and I love the blue interior too, and how you finished off the back with breadboard and trimmed out the shelves. Such attention to detail! Thanks for sharing, I really love it and am looking forward to poking around your blog!
After finishing this project I can’t wait to go back to the salvage yard. There were so many goodies just waiting for me. I can actually here them calling my name 🙂
This is exactly what I’m looking for. Storage with doors to hide the mess. I really like the rustic salvaged wood you used.
I love it!!! Now I want one for my paint stash in the basement! Open shelving are the pits for this kind of stuff!
After living with the open shelving for 20 years it was time. Good Luck.
LOve it! I am actually doing the same thing in my garage studio. I have the back half of a one car garage to use as my creative space and it is a wreck! I just bought a large bookshelf at a thrift shop and I plan to put all my paint cans in it and create some doors for it to keep things looking neat and tidy. My brother gave me a couple of kitchen bottom cabinets that I will be using for storage and will be adding a counter top for an added work station. I can’t wait to have it all finished!
While you were here I hope you checked out my workshop cabinets, my brother game them to me too. Don’t you just love brothers.
Wow! This is awesome! I love the rustic feel and that hardware totally makes it!
[…] […]
beautiful job on the cupboard! There’s no stopping you now!
gail
What a wonderful job you did. The outside rustic with the inside blue aged down is just lovely.
I am crazy about this! Great job!!!
I would love for you to stop by my blog and join our link party Something to Talk About!
We run Monday 6am-Thursday 5pm.
Have a great day!
Karen
Thanks for the invitation Karen, I just got back from joining in. Have a great week.
Great cupboard! Loved your tutorial. Now following!
Wow! You did an amazing job, turned out wonderfully!
Thanks so much for sharing at AMAZE ME MONDAY!
Blessings,
Cindy
Really, just amazing! Thank you for sharing. You are one of the features at the Make it Pretty party. Here is the link to this week’s party. http://www.thededicatedhouse.com/2015/03/make-it-pretty-monday-week-130.html Hope to see you again at the bash! Toodles, Kathryn @TheDedicatedHouse
[…] Tutorial: scavengerchic.com […]