

How to Wire a Lamp (with pictures)
- By Joan
- October 17, 2014
- 13 Comments

I find junk everywhere and if that junk is tall and thin my mind will immediately go to lamp. Who else would see an old septic pipe and think lamp? Yes, I would.
Everybody needs lamps, everybody needs more than 1 lamp and believe it or not, they are fairly easy to make.
Before I get into how to wire a lamp, I’m showing you these 4 lamps for a little DIY, upcycle inspiration.
All homemade, all recycled/upcycled. Inspired yet?

On my blog I’ve told you how to make a lamp several times. Usually my advice is to buy a lamp kit and follow the instructions in the package. But if you like to do your project with pictures, this post is for you.
First thing you need to do is to buy a make-a-lamp kit. These are available at the large home improvement stores, Walmart or Amazon carries several brands one of which can be found here…Westinghouse 70268 Make-A-Lamp 3-Way Socket Kit You can buy the pieces separately but I can’t beat the convenience of the kit.
The make-a-lamp kit calls for you to “install your locknut on existing lamp nipple”. First off, the nipple is the threaded pipe shown above in the smaller package. Secondly, I’m making my own lamp, there is no existing lamp nipple. The kit comes with a nipple that is about an inch long but you need a nipple long enough to extend down into your lamp far enough to give it support. I like the zinc plated nipples shown above, they run about 8 inches.
Almost ready to make your lamp. I’m assuming you’ve made a really cool base and it’s really sturdy…one that won’t tip over?
With a drill and a very long 3/8″ drill bit, drill a hole the length of your lamp. The drill bit needs to be at least half the length of your lamp so that you can drill from both sides and meet in the middle. If you can drill from only one side , that’s even better, you won’t have to worry about meeting in the middle. The hole needs to be as close to the exact size of the nipple as possible so there is no wiggle room.

Before wiring, make an escape point at the bottom of your lamp for the lamp wire. You’ll want your lamp to sit flat on the table. I usually do this with a circular saw, going from the hole in the center of the lamp to the outside edge. 2 saw blades width should be enough to hold your wire. The skinny piece of wood that was left over (above) was easily broken off with a flat head screwdriver. If needed, the wire can be tacked down later with a large staple.

Starting at the bottom, thread your lamp wire up through your lamp. You may find it easier to tape the ends together. I have also seen a wire inserted from the top, wrapped around the lamp cord and the cord pulled through the lamp. At this point, it doesn’t matter how much lamp cord has been pulled through, any excess can be pulled back through the lamp from the bottom.

Thread your lamp cord through the nipple ( threaded rod ) and insert into the top of your base until all but 1 and 1/4″ is sticking out of the top of your lamp base.

Thread the locknut, provided with the kit , down the length of the nipple until it is secure against your base.

Screw on the decorative neck, also provided.

The harp bottom is next followed by the cup shaped socket cap. These are both screwed on until tight. The harp bottom will eventually support the harp, though not all lamp shades require a harp.

These are the directions that come with the GE lamp kit. With a sharp utility knife split the lamp wire up the middle between the two wires about 3 inches. With these 2 wires separated , it is now possible to tie the underwriters knot above. This will prevent the wire from ever being pulled back through the lamp.


With the kit, the plastic ends of the wires have already been stripped off and are ready for wiring. If the bare wire is not visible you’ll need to take wire strippers and strip off the plastic coating.
If you look at your wire closely, you’ll notice that one side of the lamp wire has ribs on it. Loosen the silver screw, wrap the ribbed wire clockwise around the screw and retighten the screw.

Loosen the brass colored screw. Wrap the wire with no ridges clockwise around that screw and retighten.
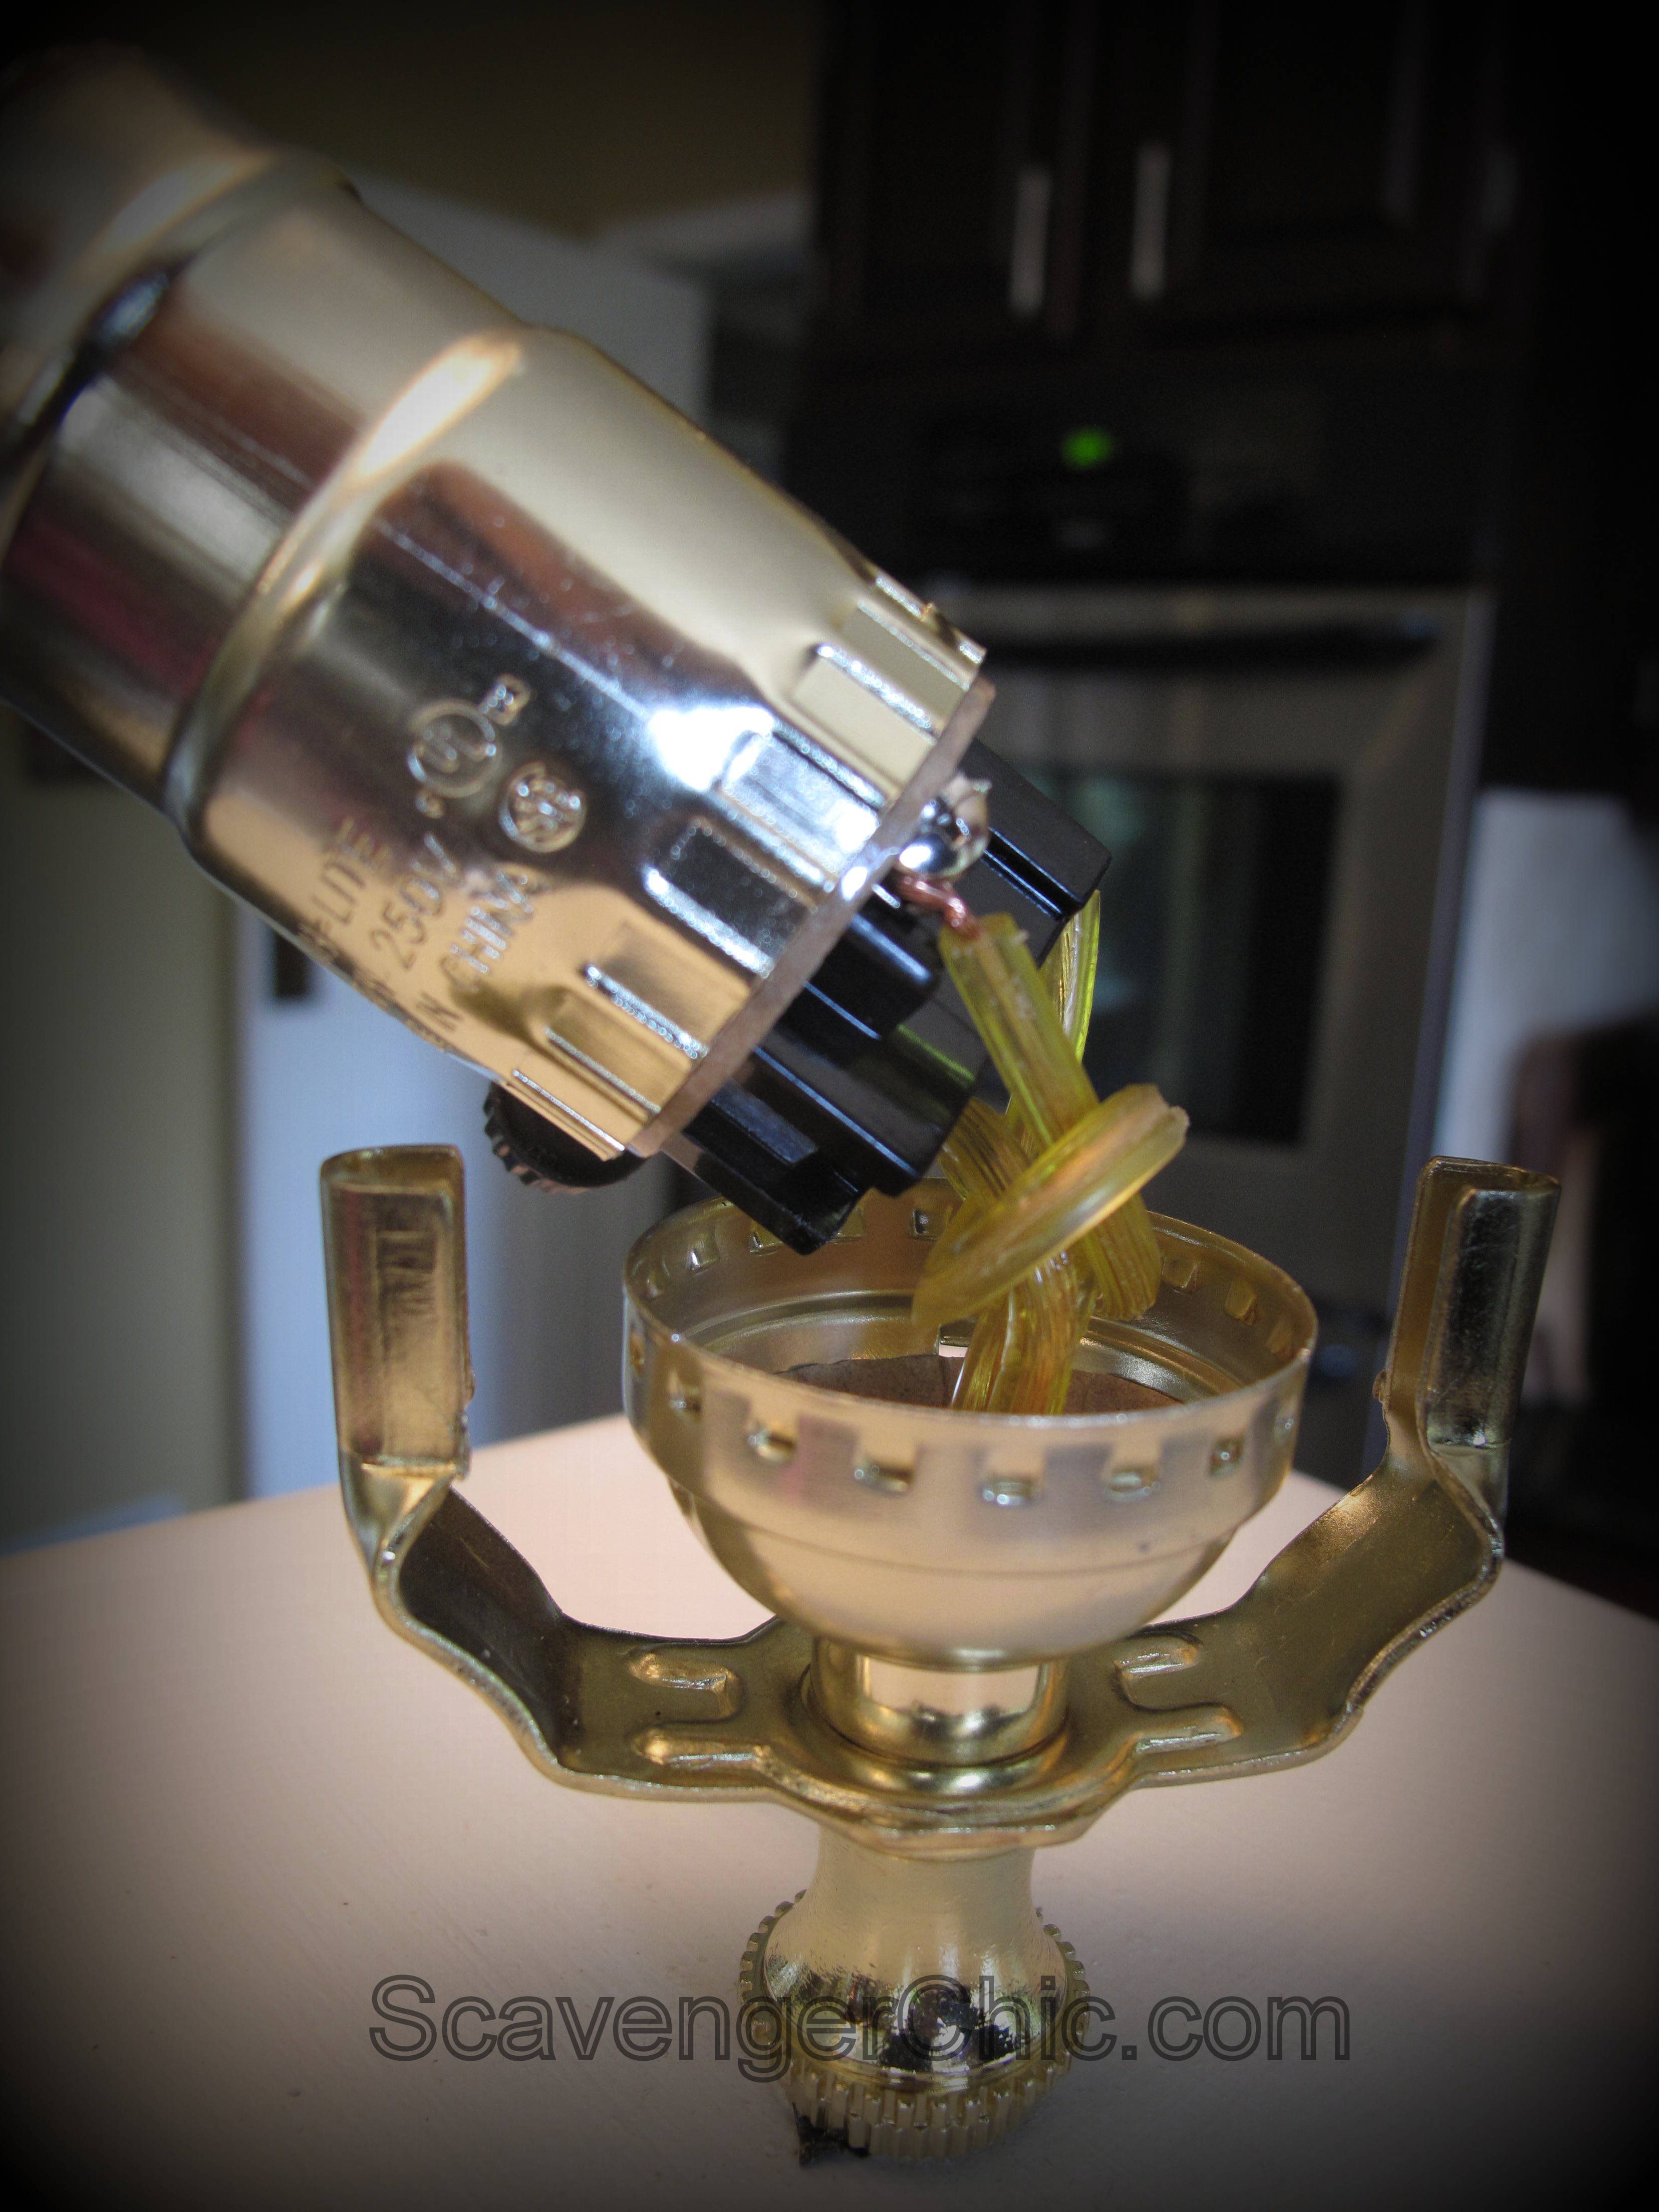
Slide the socket shell over top of all your wiring and snap into place while pulling the lamp cord from the bottom to remove any slack.

You’re ready to insert a lightbulb, plug it in and be amazed that your wiring worked.
If you’re using a shade that needs a harp , that can be installed at any time. Pinch the sides of the harp together and secure with a finial.
Now you’re ready to make a lamp out of practically anything. I showed you a few ideas already but here are a few more upcycled lamps to get your creativity moving. Click on any one of these for lots more pictures and full tutorials.
Stay inspired.
-

- Upcycled Rusty Giant Spring Lamp
-

- DIY Upcycled/Recycled Rusty Pipe Lamp
-

- DIY Upcycled Wooden Post Lamp
-

- Upcycled Watchamacallit Lamp , diy
-

- Lamp made from old Shutters
-

- Driftwood Lamp
-

- Upcycling a Rusty Septic Pipe
-

- Spotlight Tripod Lamp
-

- Surveyors Tripod Floor Lamp
-

- Rustic Pallet Wood Lamp
-

- V8 Hubcap Lamp
-

- Salad bowl Pendant Light
-

- Driftwood Buoy Lamp
-

- Oyster Shell Lamp
-

- Railroad Tie Lamp diy
-

- Driftwood Lamps
-

- Candlestick Lamps
-

- Pallet Wood Lamp
-

- Barrel Slat Lamp
-

- Poo Pipe Upcycle
Shared at Show me Saturday, Funky Junk Interiors , That DIY Party , Coastal Charm
Make it Monday, Metamorphosis Monday , Wow us Wednesdays , Vintage Inspiration Party
Thrifty Thursday, Catch as Catch Can and DIY Sunday Showcase


 Copyright © 2024
Thank you! I didn’t even know this was possible.
I can do it.
Great directions! One of these days I’m going to make my own lamp. Thanks so much for linking up at the Make it Monday Party! Hope to see you again next week.
Fabulous tutoiral! I need all the pictures I can get!
Thanks so much for sharing on Show Me Saturdays! Hope to see you again this weekend!
~ Ashley
How necessary is the nipple piece? I have an unstable lamp someone else made for me and am trying to make it more sturdy but my options are limited without ruining the sentimental lamp base.
As far as I know it really needs the nipple. There are lamp kits for bottles that work more like a cork, but something needs to anchor the upper wiring.
Please how do I get the lamp hook?
Lamp hook?
Thank you. It all worked out great. All I need now to finish up my home made lamp is a Lamp shade to fix !!! Thanks again.
Excellent directions with excellent photos! It’s frustrating when people only give half information in tutorials. Thank you!
does nipple need to be threaded in lamp base? I have old lamp and doesn’t seem to thread on new kit but when removing the nipple it feels like it is threading into something?
Whoo hoo, directions that were easy to follow. I am a potter and ready to make some lamps. Had to do a trial run. Now I am inspired
what if you doit wrong
Hi June, Don’t worry about doing it wrong, you’re not working with live wires for most of the project. Your time to check your work is right before you close everything up and see if the light is working. If it’s not working, just unplug and tighten up all your wires and retest. It’s way easier than you think. Good luck